Saturday 27 April 2013

Celariac Slaw

This week has been jam packed full of new adventures for me. I've been lucky enough to work with three super duper talented food related people. First up, the amazing food stylist Sharon Hearne-Smith who has worked with some big named chefs in the industry, second is the talented chef Neven Maguire who owns MacNean House in Blacklion and thirdly the fantastic photographer Joanne Murphy. It's been a big big week. Big for me, for my career and for this new path my life is taking.


Before I left home to set sail well, start the ferry engine back to Ireland my talented cook of a Mum made me one of my favourite dishes. Celariac slaw. I love the peppery fieriness, the way the little grated pieces make me think of grated clouds and the memories this slaw evokes of picnics at our house in the South of France and sitting on our 'magic carpet' picnic blanket, summer evenings with a fire and music and friends. Always friends.


This salad works well in the winter as well as in the summer due to the spicy nuttiness of the celeriac and the mustard powder.  Celariac is one of those ugly vegetables that doesn't really look like much but has such a punch and kick not only in flavour but in goodness that it's worth plucking these from the veggie stall.
It's known for it's diuretic qualities and is especially useful for those with kidney stones and arthritic conditions. It's also supposed to be beneficial to the urinary, lymphatic and nervous systems. Good all round then!


As for the recipe, it could not be easier. It uses 4 ingredients. Thats it.

Serves 4 as part of a main:
350g celariac, skinned and grated
1-2 tsps of mustard powered, sieved (try 1 to start and then if you want it more peppery put the other in)
6 tbsps of natural non sweet yoghurt.
½ a lemon squeezed (more if needed)


First off, sieve mustard powder and add to the yoghurt. Mix well and taste. Adjust if you want it more fiery, remember that celeriac has a spicy punch to it!


Grate the celeriac into the yoghurt/mustard mix and pour lemon juice over. This will stop it from discolouring and also adds a little 'je ne said quoi'.


Mix well and keep in the fridge. It will last for a couple of days and works well with fish or meat. Enjoy!

Saturday 20 April 2013

Homemade Chocolate


Yes you can. Have one that is. These bad boys of bittersweet goodness can be completely sugar free (and if not only contain agave syrup) and will impress your friends no end when you tell them you've made your very own chocolate!


It is so simple and produces such a large amount that it is one of those that I adore to make. Kids will have a blast and parents will love doing it with them because nothing can go wrong! It can be used to dip candied peel in, strawberries and other berries, make a sin-free hot chocolate, add fruit, nuts. Anything you want really!


All you need for this is equal amounts of Cocoa butter and Raw Cocoa Powder. I used 300g and 300g (doh!). Melt the cocoa butter in a bane marie. This is basically where you put water in a saucepan, put a bowl in the saucepan but not touching the water. Put whatever you are trying to melt into the bowl and turn the heat on. Once the water comes to a boil, turn it off.


Once your Cocoa butter has melted (it will look like melted butter) simply add in the Raw Cocoa powder. Take the time to sieve it in otherwise you'll be there far longer trying to get the lumps out!


At this point, you can add Agave Syrup. I adore my chocolate bitter and add just a teeny weeny squeeze but if you like yours a lot sweeter, add more. It is utterly taste dependant so add and try, add and try.
If you do add Agave Syrup, you will notice the consistency gets a lot gloopier and thick and lovely! It will also thicken as it cools.


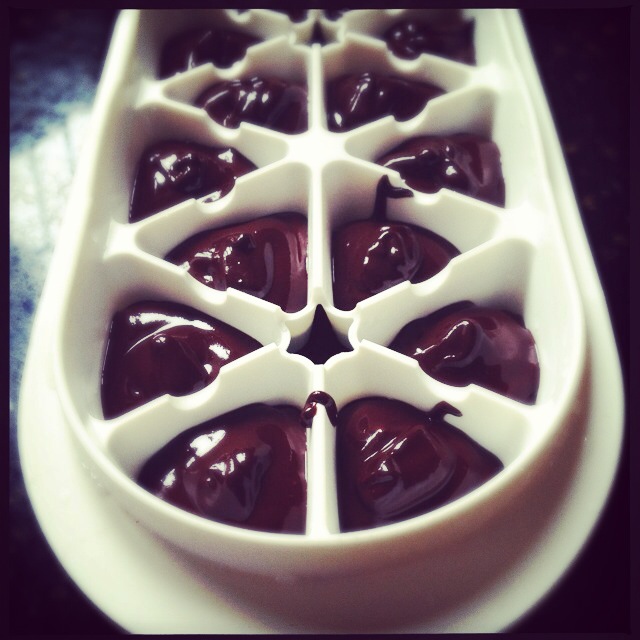
At this stage either leave it to cool so you can roll it into truffles (dusting with cocoa powder and salt is a fav option of mine) or pouring it in to moulds. If rolling into truffles you will have to go back every 10mins or so to check it hasn't completely solidified! I only had an old ice tray lying around and not really sure if it would work, I gave it a go. Bob is most definitely my Uncle as it worked like a charm!


Or if you want bark type pieces line a flat tray with baking paper and spread the mixture over. I did it this way too and used some apricot kernels as my nut of choice…turned out soooooo good!
Happy making.


There are lots of people making this recipe (all with variations but in general the same) and I should really give them a mention! Sorry I didn't before…..here, here and here.


Tuesday 16 April 2013

I love a smoker

It's true. I can't help it. Since my time at Ballymaloe and meeting all the hardworking local producers, I've become a little bit obsessed. The first one I came across was Frank Hederman, smoking genius that he is and then, we met Bill Casey who works literally a stones throw from the school grounds. Frank does hot and cold smoking, Bill only does cold if I remember rightly. Everytime I meet another smoker I get a big knock somewhere in the back of my head telling me how I'd love to do this, what recipes I would try and what my smoke shack would look like...


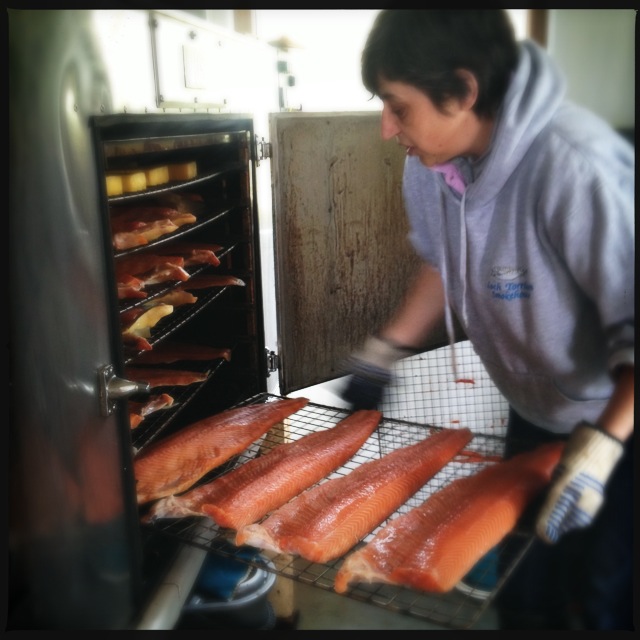
While I was visiting the West Coast of Scotland I managed to go and visit Mandy. Shieldaig's very own smoker. Ever since I can remember smoked salmon from this smokery has been finding it's way into our postbox every Christmas. First John started it and since he retired Mandy has taken over. She does both hot and cold smoking and the recipe hasn't changed since John started smoking back years ago


Roughly 2100 salmon find their way onto the filleting block and into the smoker to either be smoked cold as a whole side or sliced into fillets for a hot smoke. The taste is fantastic and with all the fish coming from local fishermen in local waters it really doesn't get any better. Salmon deemed for a cold smoke is first dry salted and the hot smoked is brined instead.


I loved visiting and seeing that anybody can set up a business in their back garden. It gave me real hope that I can be that person, I can have my own food business and be successful. Keeping it local, seasonal and being passionate about what you're doing are the real key components and I can't wait to find my way.


Sunday 14 April 2013

A quick trip over to the left.

These last couple of days I've been over on the West Coast of Scotland. Having the Great Aunty living there helps a treat as it seems hipsters from every corner of the globe are buying up tiny crofters houses, which means, there's no accommodation to be had and the pubs are all full. With the hipsters though comes new imports such as olive oil. It's hard to remember that they only had a road put in in the 70s.


Friends of ours have a prawn business over there and each visit we are gifted several kilos of prawns. For those in Ireland they would be Dublin Bay Prawns. For those in Scotland they are obviously Scottish Prawns and everywhere else in the world I'm sorry, but you'll have to chose which you want to call them. Having prepared, cooked and eaten these yummy, sometimes arm length prawns at Ballymaloe Cookery School I was quickly put to work and set to cooking. Throw in some homemade mayonnaise, using the olive oil that's now being imported, supper was delicious with a view that people would pay thousands for. Oh right, they do.


We had beautiful sunny weather most of the time and for anyone who's been to Scotland, 5 days in a row of sun is quite exceptional. Lapping it up, we went on walk after walk with the puppy. Snow peeked mountains looming over us as, we slowly and heavy breathed our way further up and up until the view got the better of us and we stopped to admire. This moment, here. Is what has made me understand why my Great Aunt moved up here in the 60's. No roads, no running water or electricity is pretty hard core. But when it's sunny and you can see for miles and mountains I can understand.


It's been a spectacular couple of days with my Maman. Hanging out, no TV, no internet just the heather on the mountains, highland cows, lambs, deer and good conversation. I've loved it.


Ballymaloe Cookery School Mayonnaise:

3 egg yolks
¼ tsp mustard
2 tbsps vinegar
8floz of oil (they do 6 of non flavoured veg oil and 2 of olive oil)

Whisk together the egg yolks, mustard and vinegar. Then very slowly but steadily drizzle in the oil, whisking all the time. Add more vinegar or mustard at the end if needs be.

Monday 8 April 2013

Super Snack Time

These little spicy crunch of yumminess are one of the simplest things to make. Granted if you were using fresh pepitas from a pumpkin/squash and had to open the fruit, then get all the seeds out etc it would be more effort, but well worth it! Supplying minerals such as phosphorus, magnesium, iron, zinc (which is great for us girlies) and a great source of Vit A, B1, B2, B3 and protein. Let just say, this is one snack that we shouldn't be without!


I use dried pumpkin seeds here but like I said, fresh ones are just as good and offer a different flavour. You can utterly decide what flavour you like on your pepitas. I chose cinnamon to give me a little bit of the sugary sweetness I'm craving without eating sugar and some cayenne, cos I need a little spice.


At Ballymaloe Cookery School, Darina loved to talk about cinnamon and especially the difference between that and cassia. Cinanamon has a huge amount of beneficial properties, but the one I want to talk about mostly is it's ability to help with regulating insulin and helping with stabilising blood sugar levels. Something else for us girls with PCOS or people with diabetes to think about.


To make:

Pepitas, as many or as little as you want
your spice(s) of choice (in Mexico they use chilli powder and lime juice or zest!)
some unscented, unflavoured oil or spray oil

Drizzle a little bit of oil over, be careful as you don't want to much. Spray oil is best as you hardly ever use too much. Then sprinkle spices over, mix all together till all pepitas are covered in oil and spices then spread out on a baking sheet in the oven on a low temp. I put it to 130C for roughly 15minutes. You want them to be more green than golden as they will turn bitter! So set a timer for 10mins and then check.

Happy snacking!


Saturday 6 April 2013

Chickpea and vegetable, tomato and coconut soup

Today there is no energy to make a big enthusiastic cooking extravaganza. Which, having just spent three months at cookery school makes me sad. But, as soon as I'm back on form, cooking extravaganza shall begin! But for now this is what happened in our kitchen...


Part of the cruciferous family (which includes the likes of broccoli) this group of veggies have been and still are receiving huge attention for their anticancer properties. Cabbage, which is considered King, is a nutrient dense, calorie low food with huge nutritional benefits such as Vit C, potassium, Vit B6, Calcium and many more. Perfect for everyday eating or for getting better.


To go with this, a tin of chickpeas, some cooked soy beans from the other night, a trusted can of chopped organic tomatoes and coconut milk. Can I quickly talk about the beloved chickpea?
First off, let's just say this bad boy bean is a big, and I mean BIG friend to us girls with PCOS. Not only is this little fella a good fibre source but it improves blood sugar levels which is great for us who have a hard time with insulin and sugar control. At a GI (glycemic index) of 42 and a GL (glycemic load) of 6.3 this is one bean that we should be eating more of.


Not forgetting the usual turmeric, salt and pepper of course. Just incase you're not aware of how good this member of the ginger family is for you (I'm talking turmeric now)…here goes. In Chinese and Indian medicine it has been and still is, a key component. The root itself is used to help a number of symptoms such as flatulence, jaundice, menstrual difficulties, toothache, bruising, the list literally goes on and on. It's also a great anti-inflammatory. In a number of experimental studies the yellow pigment, called Curcumin, has demonstrated significant anti-inflammatory activities. A big one though, is that curcumin exerts huge antioxidant effects and studies have shown positive findings towards fighting cancer.


So what did I do? Well simply put all the ingredients together and heated them up to a rolling boil. Now one little mistake I made was that the coconut milk I used was sweet and thank heavens I had to spoon the stuff out so by the time I realised I had only put in 2 spoonfuls (I'm blaming being ill for that mistake!). But if I had been using the non sweet coconut milk version, I would have used the following quantities:

1 tin of chopped (preferably organic) tomatoes
1 tin of unsweetened coconut milk
1 tin of chickpeas (dried would be fine too, just remember to cook them first!)
4 tbsp of soy beans cooked or frozen
2 big handfuls of coriander leaves
2 tsps of turmeric
1 tsps of cayenne
salt and pepper
and 3 leaves of red cabbage chopped finely.


Friday 5 April 2013

Oh bonny Scotland

Has it really been almost a week since the end of Ballymaloe? It's hard to believe that my life doesn't involve chef whites, a very (non) attractive hat and my knife set every day. After having to leave Ireland early, cue tears and sobs, due to illness I find myself back in Scotland and being welcomed ecstatically by the puppy. Although no cooking as such. Just typing seems like hard work right now!


Not only have I seemed to have put on a few pounds but so has the puppy…naughty mum for spoiling her!


The weather has been glorious albeit I can't go outside to enjoy. But I am looking forward to planting the wild garlic I have in a pot. Taking the puppy for long walks around the cliff tops and receiving the book Whole Foods Companion by Dianne Onstad.


A trip is planned to the West Coast to see family and then it's back to Ireland for work…I can't tell you how excited I am. I promise recipes will follow as soon as I'm out of my sick bed and back into the real world! Promise.