Showing posts with label Technique. Show all posts

Thursday, 7 November 2013

Crystallise me

I'm a little nervous. It's the first week of November and having just moved into my new house {yes, very exciting!} it would be lovely to spend some time here. But, and it's a big one, I just don't have that option. From here until the end of November I am off working all over the place and then I am off on a little holiday for a month. Which means I won't get to live in my new house for the whole of December... Back to Mexico I go and I'm happy that I will be coming back with my tan!

In this week that I have in my lovely new home I have one more fantastic shoot with the gorgeously talented Yolene {@cremedacitron}. She is a seriously talented and lovely person and I feel that I've made a real friend.


In preparation for this exciting shoot {pictures to follow} I had to get my crystallisation on. Spending a couple of hours with the sun flooding through my new kitchen window was a joy. A fiddly, messy and sometimes quite frustrating joy that was fun, maybe I could start a flower crystallisation factory...hmmm

I went with some gorgeously pink tinged hydrangeas and some roses....are you excited to see how I'm going to use them???


It's such a simple process and once done they can last for quite a while if stored correctly. An air tight container with some kitchen paper in between  layers so the moisture doesn't circulate. So, what do you need....an egg white and caster sugar. Yeah. It really is that easy!


Gently pull off individual petals, be really careful with this as they will bruise and this can show! If your flowers are really iccle then I would crystallise the whole thing {I did this for the individual hydrangea flowers}. In order for them to keep for months you must crystallise both sides. So paint with egg white, gently, and then sprinkle with caster sugar. If you dip I find that the sugar sticks in blobs rather than a beautiful shimmer of sugar.


So once you've painted and sprinkled lay, not touching, on newspaper and preferably in a warm place/in the sun so that they dry asap.

Once dry, store as mentioned above. Happy crystallising.


Thursday, 20 June 2013

Do you remember a while back….?

I worked on a cook book? Neven Maguires Cook book to be exact. It seems like such a long time ago, but it was only 1 month gone. I can't believe it.
During my time with them, I took the opportunity to do some little interviews with the talented people in charge of every stage of the book so that you can have a little sneak inside peak at what it's really like to work in this seemingly glamorous world!


Who'd a thunk that 12+ hour days in a kitchen would be made seem so sexy and fanciful. It's actually bloody hard graft and all the work and energy that goes into creating a cook book is extreme. We worked from 8am to 6 pm non stop, churning out dish after dish, photo after photo all to make beautiful images and tasty food for you, the people to try and get excited about.


My first interview comes from  Joanne Murphy, the food photographer…oh hurry the day when I have a book and I can have Jo working on it!
She is freelance photographer but specialises in food. And how did she get into photography? An old boyfriend gave her a Nikon after seeing Jane Fonda with one and she thought 'why not give it a whirl, it's seems a romantic career'. The rest, is history. Please have a look at her work, she really is an amazing photographer and a lovely lovely person.
Her work can be seen in these books….
McNean Cookbook - Neven Maguire 2012
Sophie Cooks - Sophie Morris 2012
Blazing Salads Cookbook 2013
ICA Cookbook 2012
and many more!


1. What type of equipment do you use?

 I use a Canon 5d mark ii and a Hasselblad.

2. When and how did you get into food photography?

 Whilst working as Art Director/staff photographer for The Dubliner I met Domini Kemp who was the restaurant critic and I started to photograph restaurants and food for her column, the rest is history...

3. What are your 3 top tips for us instagramers/bloggers who try to make our pictures beautiful?

 Use natural light, get a piece of white card to reflect light back onto your food and think about what you put the food on. Textures are key!


4. What is your favourite food to photograph and why?

 Cakes, buns, all things sweet for obvious reasons.


5. Any tips on how to get into being a photographer?

 Assist a photographer. Its the best way to figure out if its for you. And keep taking photos, even if it's just going on instagram you'll start to see your own style emerging.


6. Any exciting future projects we can know about?

 I'm really excited about a project that will be published for Christmas 2014, thats all I can say for the moment... Also I have a couple of personal projects including one with Terry (Two Wooden Horses)


7. Favourite project you've worked on and why?

 Oh thats a tough one. I've loved all of the cookbooks I've worked on. I’ve been very fortunate to work with some of the best people in the business. I love the feeling of being part of a team and its such a lovely feeling to hold the final book in your hands. 

8. Is there another photographer you really admire and why?

Ditte Isager is an amazing Danish photographer also Michael Graydon a Canadian photographer.

9. One person you haven't worked with but would love to photograph or do the photography for?

 In Ireland I'd love to work with Racheal Allen, in the Uk Jamie Oliver. 


10. If you weren't a photographer what would you do?

 If I wasn't a photographer I'd love to be a painter or an archeologist!

11. Can I come and work with you?

 Yes please!


Sunday, 10 March 2013


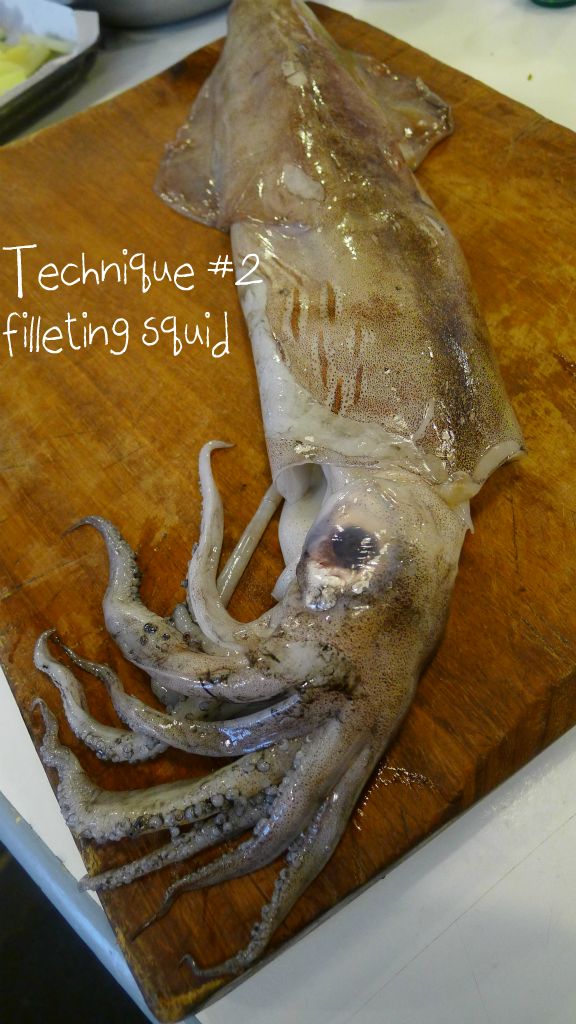
That time again. In keeping with a fish theme, let's fillet a squid. This is by far, and I really mean that, the easiest thing to fillet. 

First you need to get your hands around the head (between the eyes and the body) and pull. You're looking to pull the head along with all the insides out. Don't be squeamish, get stuck in! Then cut between the tentacles and the eyes, preferably as close to the eyes as you can get.


Next grab a hold of the quill and pull it out (squids are called the 'oceans writers')


Next it's time to peel off the wings and then the skin (that speckledy stuff)


Now all that is left is to give it a wash and chop it up. Pat on the back, you did it!


This was my version of Squid'n'Chips (with sweet chilli sauce)


Tuesday, 5 February 2013

Filleting a fish

I figured that although it's great you hearing about all the fun things we get to cook it might be a great idea to let you in on some of the basic techniques we get taught.

Filleting a fish is one of those things. Let's face it, it's easier for your fish monger to do but you should really know how.
On the 15th Feb we have a 'half term exam' here at Ballymaloe Cookery School and filleting a fish, amongst other things, could be one of our tests.

So, this is Fred the fish, he is a Sea Bass, so known by the silver shiny body and the 'look' of a fast fish. He will be ever so kind as to help me show you how to fillet. Please say 'Thank you Fred'.


I had to gut Fred myself but you can ask the lovely fishmonger to do that for you as well as de-scaling. If you didn't get that done have a look on the belly. Near to the tail there should be a fin and a small 'toilet' hole. Insert your knife in this hole and slice upwards towards the head. 


Once this has been done, there is the pleasant task of taking all the guts etc out. Moving quickly on...
Next, take the knife at a diagonal and cut from beneath the gill area up to the spine. Cut all the way until you meet the back bone.


Repeat on the other side and then break the head away from the body. 


The gills should come away with the head so that's all the stuff you can't eat out the way. If you want to use the head for stock, you will need to remove them as they will make the stock bitter.
Ok, so next step is slicing as close to the back bone as possible starting with the 'head' end and down to the tail. It doesn't have to be a big cut, just to open the flesh.


Next with the tip of your very sharp knife, slowly in little cuts and using your fingers to gently separate the flesh from the bones. Go slow as the less barbaric you can be will make a difference to how your fillet appears and also how much flesh you actually have.


Next thing, if you want to, is to remove the flesh from the skin. Hold the tail end of the fillet and cut down, not all the way through the skin, and then flatten to push it head wards. Gently rather than pushing with your knife, pull the skin towards you and wiggle your knife. The flesh should come away from the skin quite easily.


And then da-dah! Congrats. You did it.


It was great to see Rory O'Connell filleting several fish for us today and seeing how fast we should be able to do filleting with time.